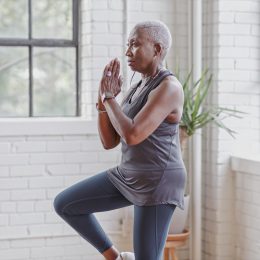
6 Best Exercises to Prevent the Dreaded Hunchback
Stand taller and stronger—for longer!—with this simple workout.
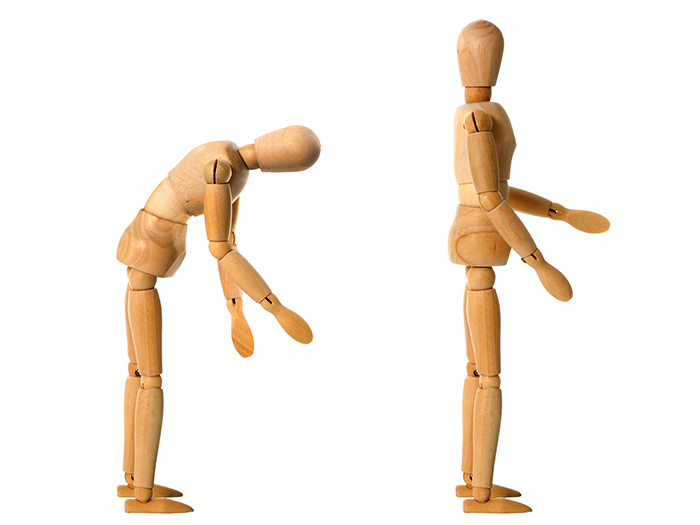
At one point or another, you’ve undoubtedly seen an older adult with a severe case of hunchback. Their upper back is rounded, their face points toward the floor, and their movements seem labored and painful.
Called kyphosis, the condition—in which the upper spine takes a C shape—affects between 20 and 40 percent of older adults, with prevalence and severity increasing as you get older, says research published in the Journal of Orthopaedic and Sports Physical Therapy. Kyphosis can limit mobility, cause pain, and increase the risk of falls.
What Causes Kyphosis?
Weakness in the core muscles and upper back as well as a history of maintaining poor posture can all contribute to kyphosis. However, the greatest cause of the spinal condition in older adults is actually osteoporosis, explains Jeremy S. Smith, M.D., a spine surgeon at the Hoag Orthopedic Institute in Irvine, California.
“Osteoporosis weakens the bones and makes them susceptible to compression fractures,” Dr. Smith says. That is, the bones in the spine, called vertebrae, can break.
“When severe, something as simple as lifting or coughing can cause a compression fracture, which commonly leads to a collapse of the front of the vertebral bone,” Dr. Smith explains. “When this occurs at multiple levels, it can lead to severe kyphosis.”
Also, as you get older, degenerative disc changes can cause the spinal vertebrae to collapse onto one another, says Leigh Ann Ibrahim, P.T., a physical therapist at Orlando Health South Seminole Hospital in Longwood, Florida.
“The vertebrae become more wedge-shaped instead of their normal cylindrical, stacked shape,” she says.
What You Can Do to Relieve or Prevent Kyphosis
In cases of existing kyphosis, adults can improve spinal alignment by doing exercises that strengthen the abdominals and the extensor muscles in the back (the ones that help you stand and lift objects). However, surgery is needed to correct severe spinal deformities, Ibrahim says.
If you think you might have kyphosis or osteoporosis, make an appointment with your doctor to discuss the best next steps.
As with all health conditions, “the best way to treat kyphosis is to prevent it from happening in the first place,” Dr. Smith says.
And that requires addressing the multiple factors that can contribute to its development, from poor posture to muscle imbalances to osteoporosis, adds Michael Silverman, P.T., director of rehabilitation and wellness at Northern Westchester Hospital in New York.
The workout below helps address all of those things. It’s specifically designed to help strengthen the muscles of the core and upper back, improve posture, and load the body through standing, weight-bearing exercises that help increase bone density and prevent osteoporosis in the spine.
What else can help: Make sure you’re getting enough calcium and vitamin D, which are vital to strong bones, and avoid tobacco products, which can increase your risk of osteoporosis.
How to Do This Workout
To help beat the dreaded hunchback, do each exercise below in order for the suggested number of reps and sets. For best results, perform the full workout two to three times per week.
As always, safety is key. The exercises here may be different or more advanced than those you’ll experience in a SilverSneakers class. If you have a chronic condition, an injury, or balance issues, talk to your doctor about how you can exercise safely.
Exercise #1: Shoulder Squeeze
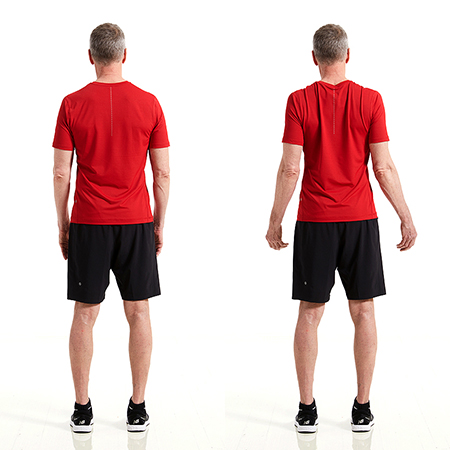 Do 3 sets of 12 to 15 reps
Stand tall with feet hip-width apart. While pulling your elbows back and down, squeeze your shoulder blades together. Imagine you’re squeezing a lemon between your shoulder blades. Pause, then release. That’s one rep. Complete a total of three sets of 12 to 15 reps, resting for 30 to 60 seconds between sets.
Exercise #2: Dead Bug
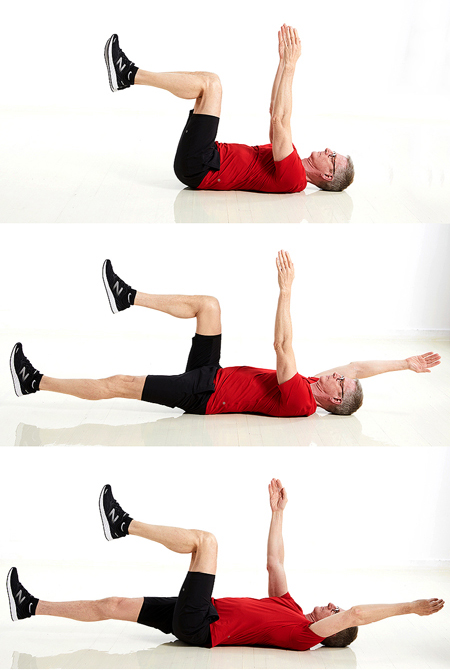
Do 3 sets of 6 to 8 reps
Lie on your back with knees bent and feet flat on the floor. Raise your bent legs up so that your knees are stacked over your hips, keeping a 90-degree bend in your knees. Brace your core to press your low back into the floor; make sure to maintain this flat-back position throughout the entire exercise. With your palms facing each other, bring arms up to point toward the ceiling.
Straighten your left leg and bring it toward the floor (try not to let it touch). At the same time, bring your right arm back toward the floor (try not to let it touch). Pause, then bring your arm and leg back to the starting position. Repeat on the opposite side with right leg and left arm extended. That’s one rep. Alternate sides for six to eight reps total. Do three sets, resting for 30 to 60 seconds between each.
Exercise #3: Bird Dog
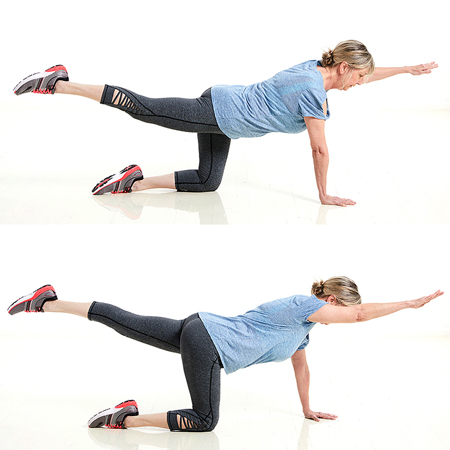 Do 3 sets of 6 to 8 reps
Start on all fours with your hands below shoulders and knees below hips. Engage your abs, keep your spine neutral, and gaze down or slightly forward.
Lift your left arm and extend your right leg until they are in line with the rest of your body. Pause, then lower back down, and repeat on the opposite side with right arm and left leg extended. That’s one rep. Perform three sets of six to eight reps, resting for 30 to 60 seconds between sets.
Make it easier: Keep your hands on the floor, and only extend your leg.
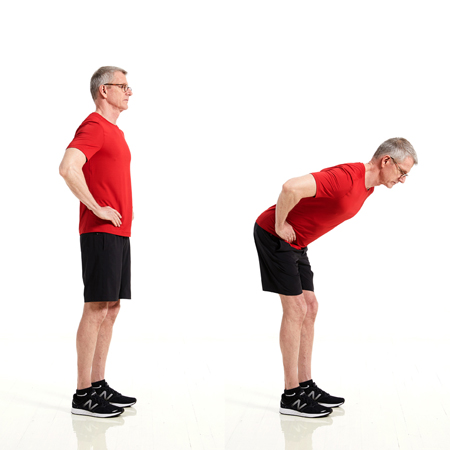
Exercise #4: Hip Hinge
Do 3 sets of 10 to 12 reps
Subscribe to our newsletter
It's quick and easy. You could be one of the 13 million people who are eligible.
Already a member? Click to discover our 15,000+ participating locations.
Follow Us
Stand with your feet hip-width apart, knees slightly bent, and hands on hips. With your weight in your heels, push your hips back behind you, and hinge forward. Continue bending at the hips until your torso is at about 45 degrees, or halfway between upright and parallel to the floor.
Squeeze your rear, push your hips forward, and slowly raise your torso back to the starting position. That’s one rep. Perform three sets of 10 to 12 reps, resting for 30 to 60 seconds between sets.
Exercise #5: Bent-Over Row
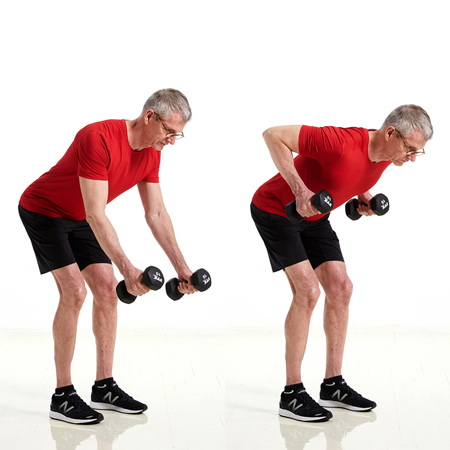
Do 4 sets of 8 to 10 reps
Grab a pair of dumbbells, and stand tall with your feet shoulder-width apart. Pushing your hips back and allowing your knees to bend slightly, lower your torso until it’s almost parallel with the floor. Let the dumbbells hang at arm’s length from your shoulders, palms facing in.
From here, squeeze your shoulder blades together as you bend your elbows and pull the dumbbells up to the sides of your torso. Pause, then slowly lower the dumbbells to return to the starting position. That’s one rep. Perform four sets of eight to 10 reps, resting for 30 to 60 seconds between sets.
Make it easier: Try the seated row machine.
Exercise #6: Stepup
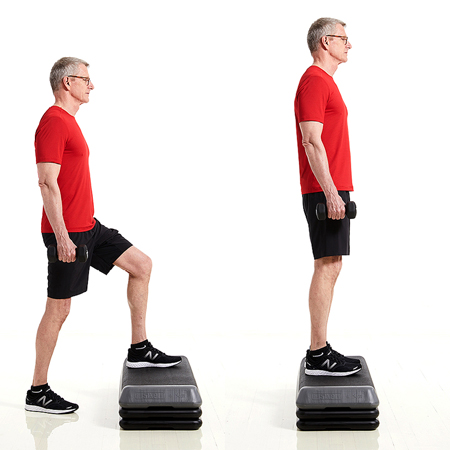
Do 2 sets of 8 to 10 reps per side
Grab a pair of light dumbbells, and hold them at your sides with your palms facing your body. Stand in front of a step. Start with a low step, increasing the height for a challenge.
Set your left foot on the step, push down through your heel, and lift yourself up until your leg is straight. Make sure you do all the work with the leg on the step rather than pushing off the floor with the other.
Step down. That’s one rep. Perform eight to 10 reps or as many as you comfortably can, then repeat on the opposite side. Do two sets total, resting for 30 to 60 seconds between each.
Take Your Favorite SilverSneakers Classes Online!
SilverSneakers members can access live fitness classes and wellness workshops through SilverSneakers LIVE. See the latest schedule and RSVP for classes here.
Not a member? If you have a Medicare Plan, it may include SilverSneakers—at no additional cost. Check your eligibility instantly here.