What to Do If Pushups, Planks, and Other Exercises Hurt Your Wrists
Try these simple tweaks to avoid pain and get more out of every rep.
“Is this exercise supposed to hurt my wrists?”
Trainers get this question all the time, especially from older adults. And the answer, of course, is a resounding no. Exercise should never hurt.
But why do so many strength moves seem to prey on the wrists? Blame general wear and tear.
“The wrists, like any other joint, are susceptible to developing arthritis as we age,” says Aaron Karp, C.S.C.S., an exercise physiologist at the Hospital for Special Surgery in New York City. “Given that we use our wrists for nearly all activities throughout the day, we have a high probability of wearing away the cartilage between all surfaces that make up the wrist.”
Plus, our modern lifestyle doesn’t help, Karp says. “It involves a lot of time in an extended wrist position—moving the back of your hands toward your forearms—while typing or using your thumbs for scrolling on your phone.”
So, if you experience wrist pain during your workouts, you’re certainly not alone. Nor do you need to avoid exercise.
“There are countless ways to perform any single exercise,” says Pete McCall, C.S.C.S., a personal trainer and host of the All About Fitness podcast. “The best version is going to be unique to each individual.”
If a certain movement hurts your wrist, McCall recommends experimenting with different variations—or trying an entirely different move. Here, experts share four effective exercises that often cause pain, plus tips to help you protect your wrists and get more out of every rep.
As always, safety is key. If you have a chronic condition (including osteoporosis, carpal tunnel syndrome, or arthritis) or injuries, talk to your doctor about safe exercise. Also check in with your doctor if you try these tweaks but continue to experience pain.
If Your Wrists Hurt During the Pushup
Performing pushups on the floor or even with your hands elevated on a bench, countertop, or wall requires a high degree of wrist extension, which can quickly cause pain.
Modify it: If you’re set on pushups, Karp recommends flexing your fingers and “grabbing” the surface you’re using (floor, bench, countertop, or wall) to engage the muscles on the palm-side of your wrist. This can add support and may ease discomfort.
Another option: Place two six-sided dumbbells directly below your shoulders, and perform pushups holding onto them. Using the dumbbells as a base takes the bend out of your wrists, which can also help relieve pressure and discomfort.
Swap it: If the modifications above don’t help, try the chest press instead. This exercise strengthens the chest and shoulders similarly to pushups while keeping the wrists in a neutral position. The chest press also allows you to adjust your resistance so you can maintain safe, proper form—which comes in handy if you struggle with bodyweight pushups.
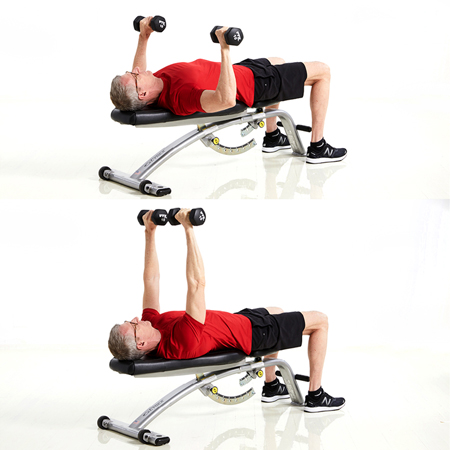
How to do it: Grab a dumbbell in each hand, and lie faceup on a bench. Position the dumbbells just outside of and above your chest, palms facing away from your body. If you have cranky shoulders, try angling the dumbbells so that your palms face each other. Your elbows should flare about 45 degrees away from your torso. Do not let them flare straight out from your sides. Brace your core to press your low back into the bench. This is your starting position.
From here, press the weights up and together until your arms are straight, but not locked out. Pause, then slowly lower the weights to return to start. That’s one rep. Perform two sets of six to 10 reps, resting for 30 to 60 seconds between sets.
You can also perform this exercise seated on the rotary chest press machine. Click here for a step-by-step guide.
If Your Wrists Hurt During the Goblet Squat
A traditional goblet squat—which requires you to hold a dumbbell vertically at your chest, with both hands on one end of the dumbbell—puts your wrists in the infamous extended position, which can be uncomfortable.
Modify it: A simple switch would be to hold the dumbbell horizontally in front of you, with one hand on each end of the weight, McCall says. This eliminates the wrist extension.
Swap it: Get extra benefits with the stepup! “Single-leg variations of the squat, like the stepup, also train stability,” Karp says. The stepup strengthens the same muscles as the squat, but by working each leg separately, it can help promote balance, prevent falls, and rehab your relationship with stairs, he says.
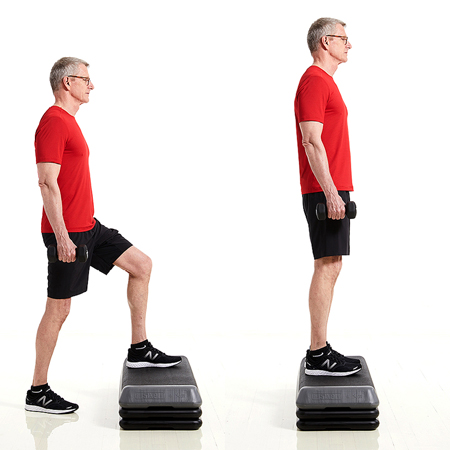
How to do it: Grab a pair of dumbbells, and hold them at your sides with your palms facing your body. Stand in front of a step. Start with a low step, increasing the height for a challenge.
Set your left foot on the step, push down through your heel, and lift yourself up until your leg is straight. Step down. That’s one rep. Perform all reps, then switch sides and repeat. Start with four reps per side, working your way up to six and then eight as you get stronger.
If Your Wrists Hurt During the High Plank
Similar to pushups—which start from a high-plank position—this exercise extends the wrists while putting a lot of weight on what might be sensitive or vulnerable tissues, McCall says.
Modify it: Try performing this exercise while holding onto two dumbbells. Simply place the dumbbells parallel directly below your shoulders, and hold the center bar with each hand.
Subscribe to our newsletter
It's quick and easy. You could be one of the 13 million people who are eligible.
Already a member? Click to discover our 15,000+ participating locations.
Follow Us
Swap it: For a no-equipment option, lower onto your forearms for a low or bent-arm plank. This will take all of the pressure off of your wrists, Karp says, but you may find it’s even more challenging on your core.
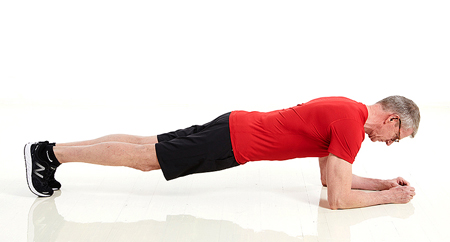
How to do it: Lie on your stomach on the floor with your elbows directly underneath your shoulders and forearms flat on the floor. Focus your eyes between your hands. Your legs should be resting behind you, knees hip-width apart (or slightly farther apart for extra balance).
From here, lift your hips toward the ceiling until your body forms a straight line from head to ankles, and squeeze your upper back, core, and glutes. Hold this position, maintaining maximal contraction, for 20 seconds.
If that’s too challenging, do the move with your knees on the floor, and lift your hips so your body forms a straight line from head to knees.
If Your Wrists Hurt During the Bird Dog
This is another exercise that puts your hands flat on the floor, and then loads them with your bodyweight, McCall says. Wrist pain can worsen during the active portion of each rep, when one arm raises from the floor—and the wrist of the planted hand has to pick up the slack.
Modify it: One solution is to lower onto your forearms like in a bent-arm plank, with your knees still on the floor. In addition to taking the pressure off your wrists, this adjustment also makes it easier to stay upright and stable, which means you may miss out on some of the exercise’s stability-strengthening benefits.
Swap it: For added core benefits, try the dead bug instead. “It’s effectively a bird dog on your back,” Karp says. And truth be told, it’s one of the best exercises you can perform for a strong and stable core.
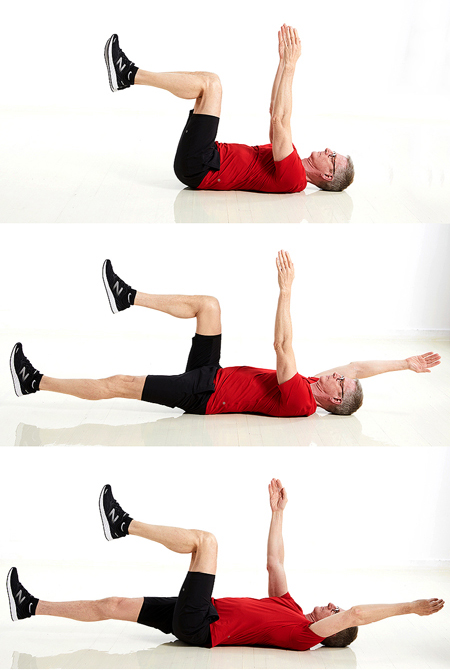
How to do it: Lie on your back with knees bent and feet flat on the floor. Raise your bent legs up so that your knees are stacked over your hips, keeping a 90-degree bend in your knees. Brace your core to press your low back into the floor; make sure to maintain this flat-back position throughout the entire exercise. With your palms facing each other, bring arms up to point toward the ceiling.
Straighten your left leg and bring it toward the floor (try not to let it touch). At the same time, bring your right arm back toward the floor (try not to let it touch). Pause, then bring your arm and leg back to the starting position. Repeat on the opposite side with right leg and left arm extended. That’s one rep. Alternate sides for four to five reps total.
Take Your Favorite SilverSneakers Classes Online!
SilverSneakers members can access live fitness classes and wellness workshops through SilverSneakers LIVE. See the latest schedule and RSVP for classes here.
Not a member? If you have a Medicare Plan, it may include SilverSneakers—at no additional cost. Check your eligibility instantly here.