3 Most Important Muscles for Staying Independent
Turns out that healthy, active aging begins in the butt. Keep yours strong with this workout plan.
If you pay attention to popular culture, you can’t help noticing that the kids seem obsessed with gluteals. Butt implants are a booming business, and a photogenic booty can turn anybody into a star on social media.
You may assume this is one of those trends that age and experience allow us to ignore. After all, if there’s any benefit to getting older, it’s the permission we give ourselves to stop worrying about whether strangers approve of our looks, especially from an angle we can’t see in the mirror.
But aesthetics aside, there’s good reason to focus on your gluteals, which consist of the gluteus maximus, gluteus medius, and gluteus minimus.
The gluteus maximus is the largest muscle on your body and one of the strongest. It’s the prime mover in running, jumping, climbing, and lifting heavy things off the floor. That means as you get older, the size and strength of your glutes determine how well you can walk, how easily you can climb stairs and navigate obstacles, and eventually, whether you can get up from a chair or use the bathroom without assistance.
A 2017 study in the journal PLOS One showed that middle-aged women with back pain had significantly smaller gluteus maximus muscles than similar women without pain. The researchers can’t say if smaller glutes lead to back pain or if back pain leads to smaller glutes. It’s probably some of both: A person with smaller glutes might rely more on her back muscles to lift heavy things, which would lead to back pain, just as a person with a bad back would be less likely to lift anything, leading to smaller, weaker glutes.
Either way, your glutes are crucial to your activity level later in life—and eventually to your independence. Those who keep their glutes strong can do more, do it with less effort, and do it longer than those who let them get smaller and weaker.
Fortunately, you can keep your bottom in top shape with a few simple exercises, says Bret Contreras, Ph.D., a strength and conditioning expert in Phoenix. Contreras, known in fitness circles as “the Glute Guy,” focuses on promoting the importance of building your backside and comes up with new ways to do it. His recommendation: the three-part exercise progression below.
Start with the two exercises in phase one, and then progress to phase two when you’re ready for more—which might be right away for some people. The beauty of this program is that even in later phases, you can still make progress on the exercises from previous levels.
Important note: The exercises shown here may be different or more advanced than those you’ll experience in a SilverSneakers class. If you’re unsure if they’re right for you, talk to your doctor or personal trainer. As always, if you feel any pain, stop right away.
Phase 1: Start with Glute Bridges and Bodyweight Squats
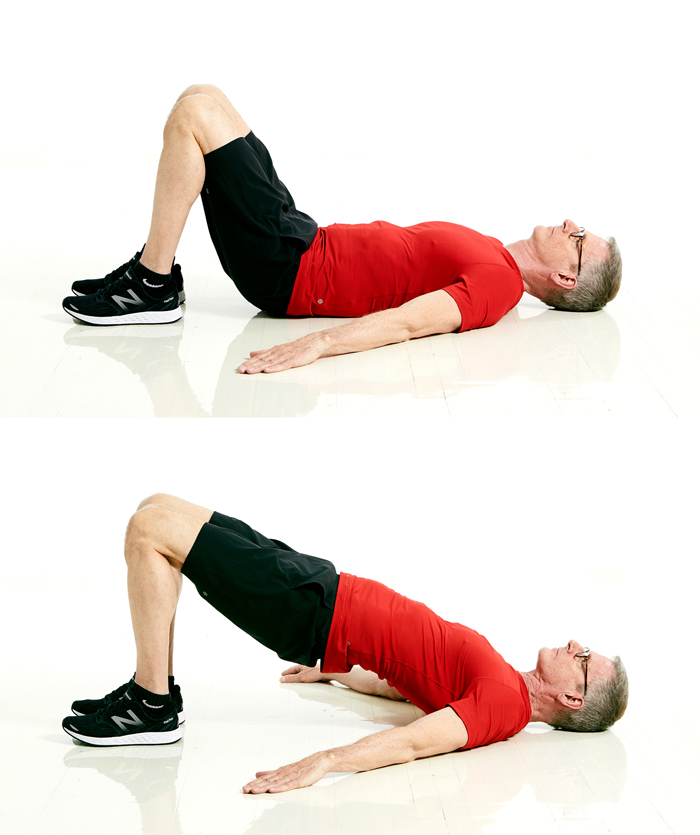
A glute bridge is simplicity itself: Lie on your back with your knees bent, feet flat on the floor, and arms slightly away from your torso. Lift your hips until your body forms a straight line from knees to chest. Pause, lower your hips, and repeat. Do two sets of eight to 15 reps twice per week.
Make it harder: When the glute bridge is too easy, add resistance by putting a miniband around your thighs, just above your knees. Once you master glute bridges with a miniband, you can increase range of motion by lifting your feet onto a box or bench. Or try hip thrusts: Put your upper back and shoulders on a bench, and keep your feet on the floor.

For the bodyweight squat, Contreras suggests doing this standing with your heels a few inches in front of a box, bench, or sturdy chair. If you don’t have one handy, imagine one behind you. Push your hips back, and lower yourself until your glutes touch the box. Rise back to the starting position. Ideally, he says, the box will be high enough so you stop when your thighs are just above parallel to the floor. Do two sets of eight to 15 reps twice per week.
Make it harder: When you feel you have mastered the basic squat and can do it without discomfort, increase your range of motion by lowering yourself a little farther, but not to the point that your lower back shifts out of its naturally arched position. The next progression is a goblet squat: Add resistance by holding a dumbbell, kettlebell, or weight plate close to your chest with both hands.
Phase 2: Add Stepups and Split Squats
Now it’s time to add two new exercises: stepups and split squats. By working one leg at a time in stepups or working with your legs split apart in a lunge, you bring the gluteus medius into action. This muscle, on the outside of your hip, is crucial to balance and stability. In a 2011 study in Archives of Gerontology and Geriatrics, Japanese researchers showed that the loss of size in the gluteus medius, more than any other muscle, is associated with a decline in daily movement and overall independence among elderly women.
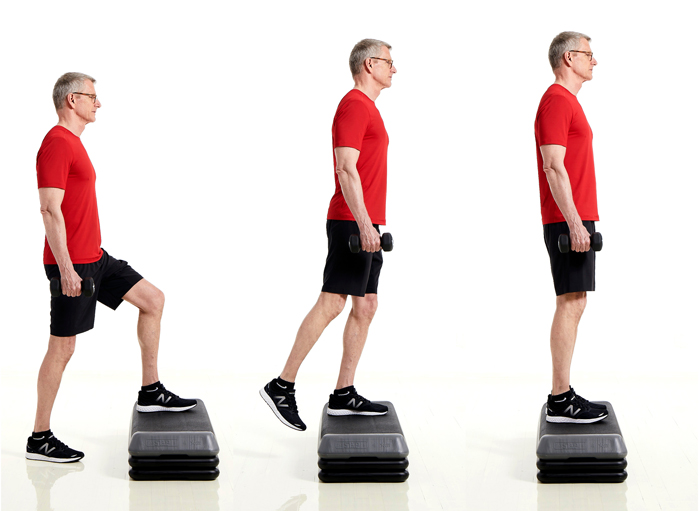
Use a low box or step for the stepup, and feel free to do it next to a wall or sturdy piece of furniture you can rest your hand on for balance. Set your left foot on the step, push down through your heel, and lift yourself up until your leg is straight. Step down. Do eight to 15 reps, switch legs, and repeat. Make sure you do all the work with the leg on the step rather than pushing off the floor with the other. Do two sets of eight to 15 reps twice per week.
Make it harder: Add resistance by holding dumbbells in your hands, as long as it doesn’t cause knee or hip discomfort. Or increase the range of motion by using a higher step.
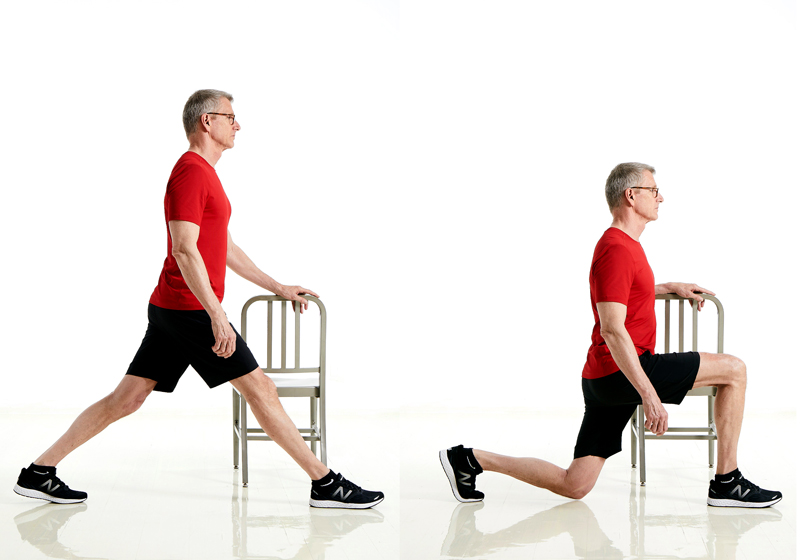
For the split squat, stand with your left side facing a sturdy chair or wall and your feet close together. Take a long step back with your left leg, so your weight is balanced between your front foot and rear toes. Keeping your chest lifted, lower yourself until both knees are bent about 90 degrees, or however far you can go without discomfort. Rise back to the starting position. Do eight to 15 reps, switch legs, and repeat. Do two sets of eight to 15 reps twice per week.
Make it harder: If you feel steady enough, do the move without using a chair or wall for support. When that feels too easy, you can add resistance by holding dumbbells in your hands.
Subscribe to our newsletter
It's quick and easy. You could be one of the 13 million people who are eligible.
Already a member? Click to discover our 15,000+ participating locations.
Follow Us
Be sure to continue doing squats and glute bridges, making progress when possible, for a total of four exercises. When you’re ready for more, progress to the third and final phase.
Phase 3: Add a Hip Hinge
The first four exercises are all derived from everyday movements. You walk with one foot in front of the other (split squat and lunge), you climb stairs (stepup), you lower yourself and get up from chairs (squat), and you straighten your hips when you’re bent over (glute bridge).
Now it’s time to work on one more practical skill: Bending over to pick something up or set it on the ground.
The best exercise for this is the Romanian deadlift when done with good form. The name is intimidating, but the movement is natural—and safer than traditional deadlifts since you aren’t lifting dead weight up from the floor. Stand holding a barbell or dumbbells in front of your thighs. Keeping your back flat, push your hips back as you lower the weights to your knees or just below. Straighten your hips, and repeat.
Make it easier: If that’s too challenging, ditch the weight, and perform a hip hinge.
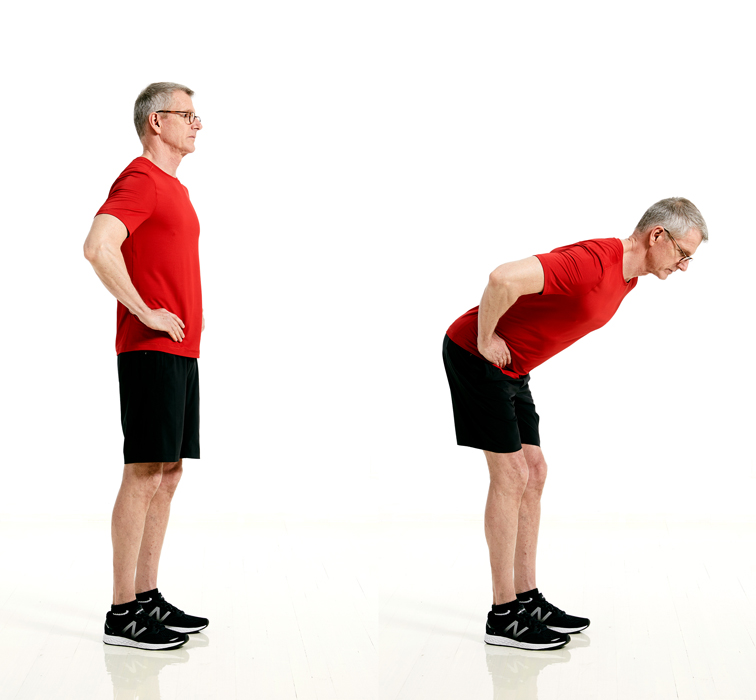
To do a hip hinge, stand with your feet hip-width apart, knees slightly bent, and hands on hips. With your weight in your heels, push your hips back behind you, and hinge forward. Continue bending at the hips until your torso is at about 45 degrees, or halfway between upright and parallel to the floor. Squeeze your glutes, push your hips forward, and slowly raise your torso back to the starting position.
Whichever option you choose, do two sets of eight to 15 reps twice per week.
At this phase you’re doing five exercises altogether, and a total of 10 sets. The result? Stronger, more resilient gluteal muscles. And if they get more photogenic in the process, well, let’s just say it beats the alternative.
Check Your SilverSneakers Eligibility Instantly
SilverSneakers gives you free, unlimited access to more than 15,000 gyms and fitness centers across the nation, plus classes and tools designed to keep older adults strong and independent. Check your eligibility instantly here. Already a member? Get your SilverSneakers member ID and exclusive content by logging in to or creating your online account here.