Find Your Place: 10-Minute Sit and Get Fit Workout
Grab a chair, and get ready to improve your posture, strengthen your body, and boost your energy.
If you’ve been to a SilverSneakers class or followed along with our videos, you’ve probably heard the instructor say that it’s okay to use a chair for support or to make a move easier. With this 10-minute workout, the chair takes center stage.
“We can get in a lot of fitness when we sit,” says SilverSneakers fitness expert David Jack. In fact, chair exercises can help you improve your posture, breathing, strength, flexibility, and balance. “This routine sets your body up to move well.”
Chair workouts are a great option if you have a hard time getting up and down from the floor, or if you’re recovering from an illness or injury. Never exercised before? This gentle routine can help you ease into it—and gain confidence so you can try other activities.
Even if you have no problem getting up and down from the floor, this chair workout can be a great addition to your rotation. It’s a terrific way to fine-tune movement patterns so you can sit, stand, and walk with more ease and less pain.
How the 10-Minute Sit and Get Fit Workout Works
Find a sturdy chair or bench, making sure it won’t slip on the floor as you move. You don’t need other equipment, but if you have a small pillow, yoga block, resistance band, or towel, you can keep those handy. It’s also helpful to have water to sip as you need.
All you need to do is press play and follow along. If you’re performing the workout on your own, do the exercises below in order.
To keep tabs on your effort, use a scale of 1 to 10, with 10 being the hardest. You can ramp up or dial down as you need, but you generally want to stay in the 5 to 7 range. As you move, keep breathing, and prioritize good form. You should feel some resistance as you move—but no pain. If you feel pain, scale back.
As always, safety is key. These exercises may be different or more advanced than those you’ll experience in a SilverSneakers class. If you have a chronic condition (including osteoporosis), an injury, or balance issues, talk to your doctor about how you can exercise safely.
Exercise #1: Seated Sweet Spot
Most of us spend hours sitting every day. If you sit with poor posture—shoulders sloped forward, back arched or rounded—that can restrict your breathing, cause pain, and contribute to a hunchback. So, first things first: You want to find your sweet spot for a seated position.
How to do it: Sit comfortably with your feet flat on the floor. Fold forward slightly, and let your head relax down. Next, gently reverse the motion to arch your chest and back. If you’d like, you can lift your chin and look up.
Now, find your sweet spot where you are most comfortable between those two positions. Your spine should be neutral, so you’re neither bending forward nor arching back. Your chest should be lifted, but not sticking out. Roll your shoulders down and back away from your ears, and feel your sit bones support your body.
This seated sweet spot is where you’ll begin each exercise. You can also do this posture check anytime of day.
Exercise #2: Shoulder Squeeze
This is a subtle movement that engages your upper back and the sides of your torso. On a scale of 1 to 10, aim for 3 in terms of effort.
How to do it: Begin in your seated sweet spot. Gently hold your knees or upper thighs as you sit up, and squeeze your shoulder blades together. Hold the squeeze, but continue breathing. Release your hands, and relax your upper body. Do three reps.
Exercise #3: Belly Breathing
Now that you have your sitting posture, add a breathing exercise. The combination of good posture and good breathing can boost your energy and mental focus.
How to do it: Begin in your seated sweet spot. Gently hold your knees or upper thighs as you sit up. Place one hand over your belly.
Inhale deeply, filling your belly with air. Exhale slowly, pushing all the air out of your belly. Take three breaths in and out, feeling your belly expand and contract with your hand. Switch hands and repeat.
If you start to feel dizzy or uncomfortable, take shorter, shallower breaths.
Exercise #4: Inner Thigh Squeeze with Torso Rotation
This is a two-part movement that strengthens your inner thighs and then stretches your torso. On a scale of 1 to 10, aim for 3 or 4 in terms of effort.
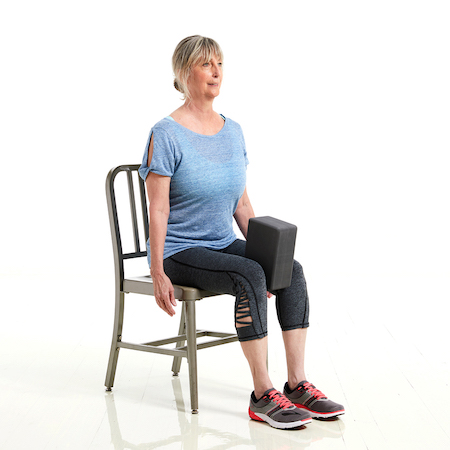
How to do it: Begin in your seated sweet spot, and hinge forward slightly from your hips. If you can, place your left elbow against the inside of your left leg, just above the knee, and press your palm against your right leg, just above the knee. If that’s uncomfortable, put a small pillow or yoga block between your knees.
From here, gently squeeze your knees against your forearm, pillow, or yoga block. Pause, and then release. Repeat three times.
Next, keeping your left forearm, pillow, or yoga block in place, rest your right hand against your right thigh for support. Gently rotate your torso to look to your right. Relax your neck, and open your chest. Take three breaths in and out, deepening the stretch if it’s comfortable.
Return to your seated sweet spot, switch arms, and repeat the sequence.
Exercise #4: Leg Squeeze and Lift
This is another two-part movement, and this one stretches and strengthens your legs.
How to do it: Begin in your seated sweet spot. Place your hands on the edge of the chair. Keeping your right foot flat on the floor, extend your left leg in front of you with heel on the floor and toes pointing up. If that feels okay, gently squeeze the muscles in the front of your thigh (a.k.a. your quadriceps), pulling your toes toward you.
Subscribe to our newsletter
It's quick and easy. You could be one of the 13 million people who are eligible.
Already a member? Click to discover our 15,000+ participating locations.
Follow Us
If that feels okay, press into your right foot, and gently lift your left foot off the floor. But if extending or squeezing your leg was uncomfortable, bring your left leg in, and lift your knee instead. Pause, and then release. Do three reps.
Return to your seated sweet spot, switch legs, and repeat the sequence.
Exercise #6: Outer Thigh Squeeze
This movement targets your outer thighs and hips. On a scale of 1 to 10, aim for 3 to 5 in terms of effort.
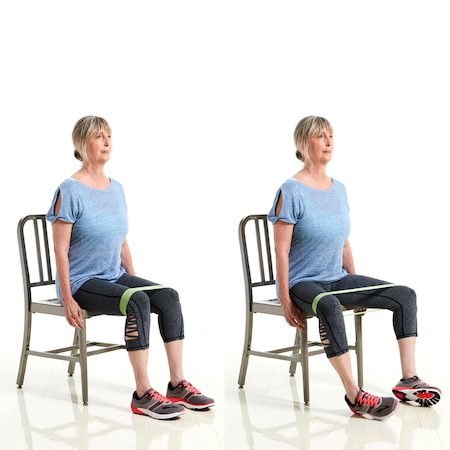
How to do it: Begin in your seated sweet spot. Move your feet closer together, and hinge forward slightly from your hips. Place your hands right above your knees with fingers facing in and elbows out to create slight resistance. Or you can use a resistance band or towel right above your knees.
From here, press your thighs out against your hands or band until you feel tension. Pause, and then release. Do three reps.
Exercise #7: Dip, Squat, and Walk
This is a three-part movement that combines a modified triceps dip, a modified squat, and short walk. It’s a great way to preserve your ability to stand up on your own and work up to a bodyweight squat.
How to do it: Begin in your seated sweet spot. Walk both feet out a few inches from the chair, or take a split stance with one foot forward and one foot closer to the chair. Place your hands on the edge of the chair, and lift your bottom to hover over it.
From here, bend your elbows slightly for the smallest of triceps dips, and then press back up. If that’s uncomfortable, skip the dip, and simply support yourself with your arms as you hover over the chair. Do three reps.
From here, return to your seated sweet spot, and reset your feet. Press into your feet, and push your body forward. Raising one arm a time to shoulder level, hover over the chair in a squat. Make sure knees don’t cave in and your chest is lifted. Pause, and then press into your feet again to stand tall.
From here, walk a few steps away from the chair. Turn to your right to walk back, and repeat the sequence. Next time, turn to your left to walk back to your chair.
Take Your Favorite SilverSneakers Classes Online!
SilverSneakers members can access live fitness classes and wellness workshops through SilverSneakers LIVE. See the latest schedule and RSVP for classes here.
Not a member? If you have a Medicare Plan, it may include SilverSneakers—at no additional cost. Check your eligibility instantly here.